 Made in DeveloperHub
DeveloperHub provides powerful tools to enable you to easily move your content around, edit it and restructure it, all out of the editor.
Import Sources
You can import to DeveloperHub from many sources:
DeveloperHub export (available for entire project imports and one page imports)
Other sources, such as: HTML, Confluence, Word or other external sources.
Import DeveloperHub.io Export
To import documentation, follow these steps:
Make sure your import files are structured as required.
Open Project Settings → Import & Export.
Click Open import.
Choose DeveloperHub.
Importing could take a few seconds up to a minute.
All imports add versions. Versions, documentations and pages are never overwritten.
Import a page into DeveloperHub
You can import a single Markdown or a Darkdown page at a time into DeveloperHub.
To import one page, follow these steps:
From the index, choose the page to import over, or create a new page and save it.
Under the title, click on Import icon
Choose the file to be imported.
Structuring Files
To import documentation from DeveloperHub export into DeveloperHub, you must structure your files as such:
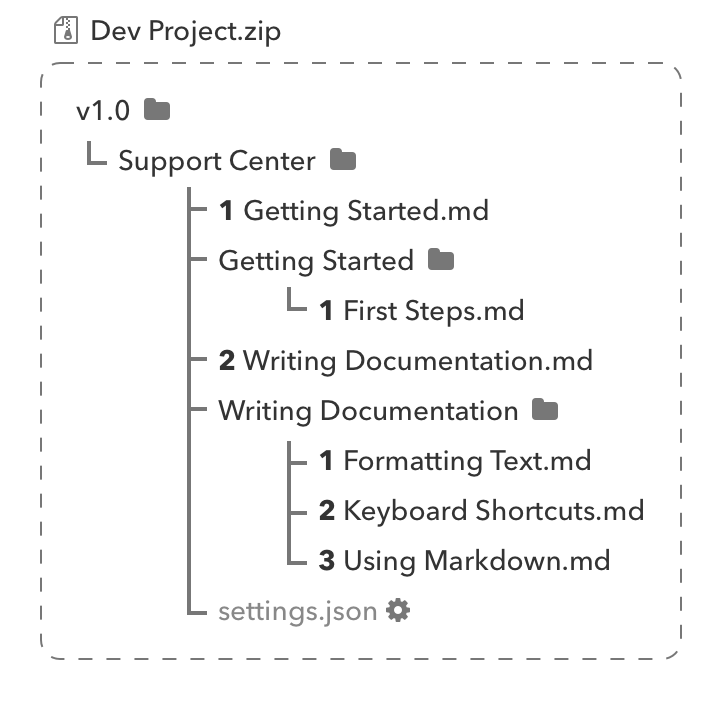
Where, for example:
v1.0is the name of your version.Support Centeris the title of your documentation.1 Getting Started.mdis a documentation page written in Darkdown format. Its order is 1st in Support Center documentation and its title isGetting Started.Getting Startedfolder indicates that1 Getting Started.mdis a parent page, and it has a subpage titledFirst Steps.1 Formatting Text.md,2 Keyboard Shortcuts.mdand3 Using Markdown.mdare all subpages of Writing Documentation page.settings.jsonisSupport Centerdocumentation settings file. Settings file is an optional file.
Every parent page should have a a Markdown file and a folder with the same exact name.
The orders must be incremental and starting from 1. If an order is not supplied in the file name, then no index order is guaranteed.
Additionally, you may add OpenAPI spec files in a folder named refs in the version folder.
All the files in the import must be compressed into a ZIP file.
Darkdown Format
Darkdown Format is simple. Each file must contain a header and optionally content.
Header
Each file contains a header depending on the index element being described.
Page:
Category:
Link:
Separator:
Content
Category, link and separator elements do not have content. Pages do have content, and it can be pure Markdown or Markdown mixed with our powerful blocks annotation.
Draft and published page contents can be defined in an export and it is annotated by a ---draft or ---published header, such as:
An example of published content that contains a heading, text and a code block would be:
Blocks
As Markdown does not include many of our powerful features, so we created Darkdown formatting to enable such features. All blocks are exported as such:
Where type is one of code-block, image, video, table, github-code, synced-block, tab-block, index-list and custom-html. Data definition depends on the type.
Inline Blocks
Additionally, inline blocks are exported in Darkdown format such as badges, icons and keyboard keys. For example,
This badge: Great! would be formatted as:
And this icon: would be formatted as:
Feel free to export any page to understand the formatting of its contents.
Table Format
Tables are exported in Markdown format, except if column width is set then we use the Darkdown format in order to retain the information.
The Markdown format for tables used for imports and exports are as such:
Requirements:
All rows start and end with
|.Every column is separated by
|.A header row must exist.
A separator row under header must exist.
Multiline cells use
\nto separate lines.
Image Import
If an image is referenced in Markdown format in one of the pages, it will automatically be downloaded to our servers and served from our content delivery network.
Images can be uploaded from two sources:
HTTP, or
Local
Regardless of the image source, each image must be at maximum 10MB in size. Otherwise, the import will fail.
By importing images on DeveloperHub, you are responsible to ensure that you have rights to all data.
HTTP Image Import
To import images from the internet, they should be referenced as such:
It will then be downloaded from its source, and uploaded to our content delivery network. The image must be accessible online publicly, otherwise the import will fail.
Local Image Import
To import images locally from the provided ZIP file, they must exist in a folder named assets alongside the versions.
They should be referenced as such:
Inside assets folder, any folder structure is allowed.