 Made in DeveloperHub

Synced blocks enable you to create a single piece of content (single-sourcing) that can be reused across multiple pages as often as necessary. When you modify a synced block, those changes are automatically reflected across all pages where the block is utilised, ensuring consistency and efficiency in your content management.
Reuse Content - Creating Synced Blocks
To create a synced block:
Type / on a new line or click on the on the left of any line.
Choose Synced Block . The Choose a Synced Block dialog opens.
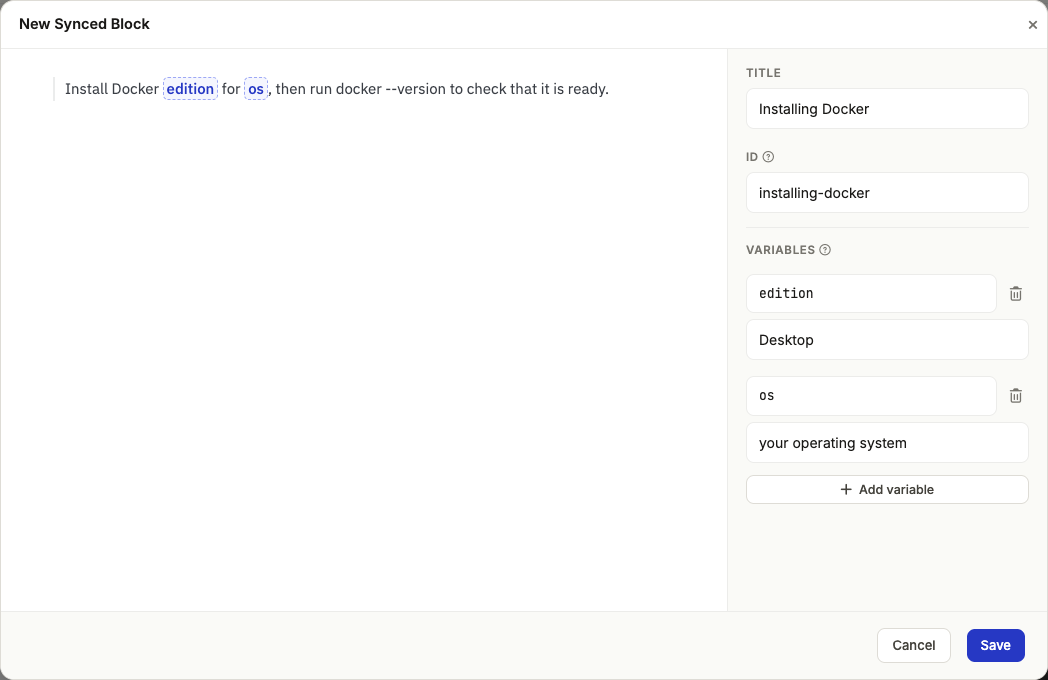
Click Create . A form will show, with the contents on the left and the block's details in a panel on the right.
In the form, you need to define:
The contents: Utilise the editor to compose the contents of the synced block. These contents are flexible and can be modified later. Feel free to include any blocks that are already supported in DeveloperHub.
Title: Select a title that accurately represents the content, making it easy for your teammates to locate. Note that the title is editable and can be changed later.
ID: An identifier for the synced block. It fills in from the title as you type, and you can change it until you save. Once saved, the ID cannot be modified. This ID will be visible in your exports. For example, if you are creating a guide on installing Docker, your ID could be
docker-installation.Variables (optional): Words that each instance of the block can set for itself, like a product name or a version. See Variables in Synced Blocks.
Reuse a Synced Block
To reuse a synced block:
Type / on a new line or click on the on the left of any line.
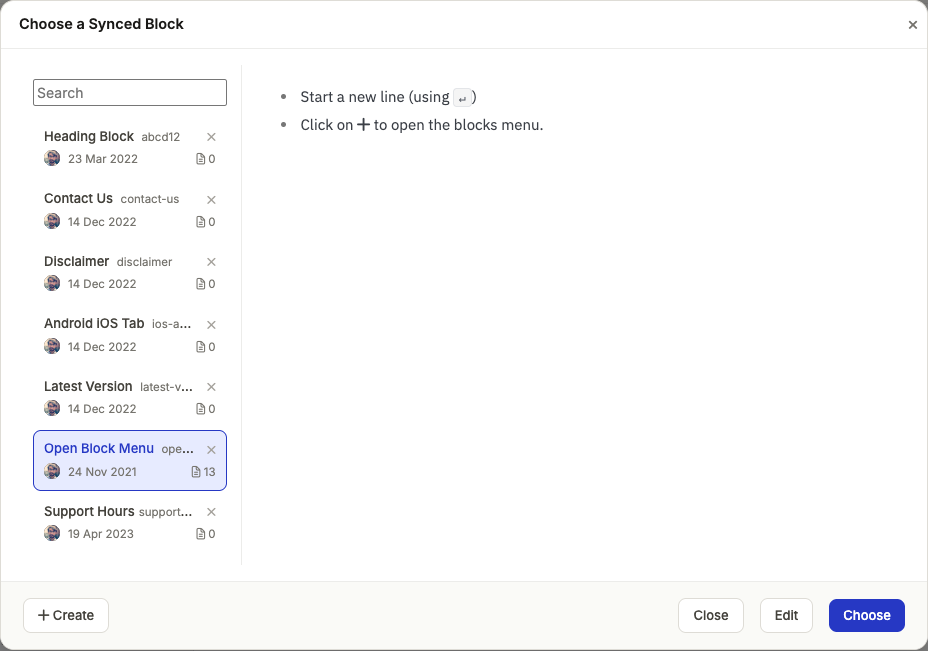
Choose Synced Block . The Choose a Synced Block dialog opens.
Select the synced block you want to reuse, or search for it first. Its contents preview on the right.
Click Choose.
Identifying a Synced Block
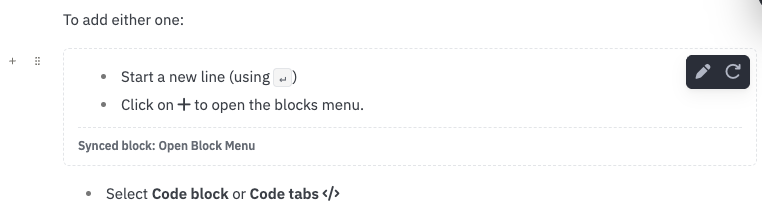
When you're in the editor, a synced block is outlined with a dashed border and labelled Synced block: followed by its title, so you can see exactly which contents belong to it. Hovering it shows a toolbar at the top right with Edit and Replace . If the block has variables, the toolbar also has Variables , and the label says how many values that instance has changed.
Editing a Synced Block
Modifying a synced block changes its contents in all instances it is used. This operation can only be done by Publishers.
To edit a synced block:
Go to a page that has the synced block to be edited.
Hover the synced block and click Edit in the toolbar at its top right.
A form will appear where you can modify the title, contents and variables.
Make the changes and click Save.
The footer of the form says how many pages use the block, so you know how far a change reaches before you save it.
To swap a synced block for a different one, click Replace instead and choose another block.
Variables in Synced Blocks
Variables let one synced block read differently on each page. For example, an installation block can name a different tool on each page that uses it, while the steps stay the same. The block sets a default value for each variable, and each instance of the block can give its own, so the same block used twice on one page can read differently in each place.
Adding a Variable
Open the block's form, by creating a block or editing one.
In the panel on the right, under Variables, click Add variable.
Give the variable a name, like
tool, and optionally a default value, likeAcme CLI. A name starts with a letter, has at least two characters, and uses only letters, numbers and underscores.Place the variable in the contents. Type
%and pick it under Block variables, or type/and choose Block variable. It shows as a chip, and pointing at the chip highlights its variable in the panel.In code, write the name between percent signs instead, like
%version%.Click Save.
Every page using the block now shows the default value wherever the variable is placed.
Setting Values on a Page
Hover the synced block on the page and click Variables in its toolbar.
Type a value for each variable you want to change. Each empty field shows the default, and a field left empty keeps showing it.
The values belong to the page, so they are saved, drafted and published with the page like any other change. Changing a default in the block updates every page that does not set its own value straight away, because synced blocks have no drafts.
Good to Know
A variable's name cannot change once the block is saved, just like the block's ID. To rename one, add a new variable, move its uses to it, then remove the old one.
Removing a variable that the contents still use leaves those places empty, so the panel warns you first and shows how many places use it. In a code block, its
%name%shows as typed instead, or as the project variable of that name if there is one.A variable with the same name as a project variable takes over that name inside the block's code, so
%version%there means the block's variable. The panel notes it when this happens. Everywhere outside the block, the project variable is unchanged.A value can contain a project variable, like
%latest_version%, in a default or in a page's value. It shows that project variable's value.Heading anchors follow the values. A heading in the block that contains a variable takes its link anchor from the value shown on that page. So the same heading can have a different anchor on each page, and changing a value, or a default that pages use, changes the anchor and breaks links that point to the old one.
Values are not translated. A translated page shows the same values as its source page, so keep words that need translating in the block's contents.
Readers' personalised variables do not change block variables. Personalisation fills in project variables only.
Deleting/Archiving a Synced Block
Once a synced block is added to your project, it can never be deleted but it can be archived. Archiving a synced block does not remove its instances from any page it is added to, but it only removes it from the list of synced blocks that your teammates can choose.
To archive a synced block:
Type / on a new line or click on the on the left of any line.
Choose Synced Block . The Choose a Synced Block dialog opens.
Find the synced block to archive, and hit the icon next to it.
Confirm your choice.
Editing in a Synced Repository
If your project uses GitHub Sync, your synced blocks are mirrored to the repository under _synced-blocks/, one file per block, named after the block's ID. You can write and review a block there like any other change, and blocks you edit in the editor are committed back. See Synced Blocks for the file layout and frontmatter, including how a block declares its variables and how a page sets its own values.
Using Page Links in Synced Blocks
You can link to pages inside a synced block. However, there are limitations to its use.
When the synced block is used in a different version than the one created in, it will be matched using the page slug. Changing the page slug in the source version or the destination version will break the link - and you will be notified when viewing a page that has the synced block.
For example: If you created a synced block that links to "Contact Us" page in v1.0 having "contact-us" slug, then used the synced block in v2.0 and later changed the Contact Us page slug to "how-to-contact-us", then the page link will break in v2.0. You would need to create a separate synced block for v2.0 to handle this situation.