 Made in DeveloperHub
Conditional Content lets you control who can see specific content in your documentation based on user variables. Content visibility is managed through audiences, which define conditions that are evaluated against variables passed in a signed JWT. This works on a private project through custom login, and on a public docs site through a signed link.
This is a beta feature. Your feedback is appreciated.
There are two ways to use Conditional Content:
Page-level Audiences: Apply an audience to an entire page to control who can access it.
Conditional Blocks: Use conditional blocks to control visibility of specific content within a page.
Both methods use the same audience system and conditions.
Managing Audiences
Audiences are created and managed in Project Settings. Each audience has an ID and a set of conditions that determine when content is visible.
Creating an Audience
To create a new audience:
Open Project Settings → Content → Audiences.
Click Create audience.
Enter an Audience ID (this ID will be used to reference the audience). It must start with a lowercase letter, and can contain only lowercase letters, numbers and hyphens.
Click Save.
Editing Audience Conditions
To edit the conditions for an audience:
In Project Settings → Audiences, find the audience you want to edit.
Click on the menu next to the audience.
Select Edit.
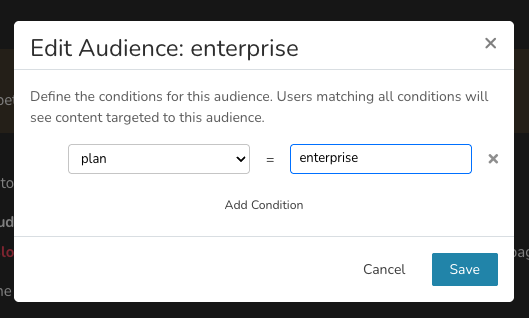
Use the expression builder to add or modify conditions.
In the expression builder, you can add as many conditions as needed. Each condition checks that a variable matches a value. All conditions must be satisfied for the content to show.
Deleting an Audience
To delete an audience:
In Project Settings → Audiences, find the audience you want to delete.
Click on the menu next to the audience.
Select Delete.
If an audience is in use on pages or conditional blocks, deleting it may affect content visibility.
Setting Page Audience
You can apply an audience to an entire page to control who can access it. Page audiences are hierarchical, meaning child pages inherit their parent's audience automatically.
Applying an Audience to a Page
To set an audience on a page:
Open the page you want to restrict.
In the right sidebar, open Page Info and go to the Settings tab.
Under Audience, select an audience from the dropdown.
The page will now only be visible to readers who match the audience conditions.
By default, all pages have their audience set to public, meaning they are visible to everyone.
Audience Indicator
When a page has an audience set on it, editors will see a lock icon next to the page title in the index, indicating that the page has restricted access.
Conditional Blocks
Conditional blocks allow you to control the visibility of specific content within a page. Each conditional block is assigned an audience.
To change the audience of a conditional block, click on the audience label (shown with a grey background) at the top of the block and select from the available audiences.
Learn more about using Conditional Blocks.
How Audiences are Evaluated
When a reader accesses your documentation, their audience is determined by matching the variables in their JWT token against the audience conditions.
Variables are passed through the vars object in the JWT payload when using custom login. For example:
These variables are then matched against the conditions defined in each audience to determine which content the reader can access.
Identifying Readers on a Public Docs Site
Audiences are not limited to private documentation. A public docs site can identify a reader from a signed link, so you can tailor what each reader sees without putting your documentation behind a login.
Your Access method stays Public. The only thing you need to set up is an API Key with the access.write Modify access rules permission, which is the key your token is signed with.
To identify a reader:
Sign a JWT in your backend exactly as you would for custom login, putting the reader's details in the
varsobject. An expiry is required.Send the reader to your docs site with the token in a
jwtquery parameter, for examplehttps://docs.pied-piper.com/getting-started?jwt=<token>.Your docs site verifies the token, applies the audiences the reader matches, and removes the token from the URL.
A reader who arrives with no token, or with one that has expired or cannot be verified, is not sent to a login screen. They see the public documentation, which is everything you have not assigned to an audience.
Variables injected through the vars and hvars query parameters or the vars cookie personalise text, but they do not put a reader into an audience. A reader can change them, so they can never unlock audience-gated content. Sign a JWT for anything you need to restrict.
Link to a page inside your docs base path. If your documentation is served at
pied-piper.com/docs, a link topied-piper.com/?jwt=...sends the reader to/docsand the rest of the path is lost.A reader who has already been identified is not identified again until their token expires. Sending a new link with different variables has no effect while the previous one is still valid, so prefer short expiries.
The Generate JWT button in Project Settings → Access is only available when the Access method is JWT, so sign your test tokens yourself.
error_redirect_urlhas no effect on a public project, as there is no error screen to redirect from.
Audiences and Search
Search results are filtered based on the reader's audience. Readers will only see search results for pages and content they have access to, ensuring that restricted content remains hidden even in search.
AI Assistant answers the same way. It draws on the documentation the reader is entitled to see, so an identified reader can ask about audience-gated content and find it, while an unidentified reader is answered from the public documentation alone.
If you require more of the Conditional Content feature, please do not hesitate to contact us.