 Made in DeveloperHub

Supercharged plan users can collaborate with their teammates on reviewing and writing documentation. Teammates can have different roles.
User Roles
Each teammate can have one of the four user roles that we support. The roles are - in the order of most authoritative to least:
Admin, where Owner is always an admin.
Publisher
Writer
Reviewer
A breakdown of the permissions is detailed below:
Role | Admin | Publisher | Writer | Reviewer |
|---|---|---|---|---|
Read draft and published pages | ✅ | ✅ | ✅ | ✅ |
See page history | ✅ | ✅ | ✅ | ✅ |
Comment on pages | ✅ | ✅ | ✅ | ✅ |
View teammates | ✅ | ✅ | ✅ | ✅ |
Download PDF export | ✅ | ✅ | ✅ | ✅ |
Create/edit page drafts | ✅ | ✅ | ✅ | ❌ |
Create/edit API references drafts | ✅ | ✅ | ✅ | ❌ |
Create synced blocks | ✅ | ✅ | ✅ | ❌ |
Create unpublished documentation section | ✅ | ✅ | ✅ | ❌ |
Delete pages | ✅ | ✅ | ❌ | ❌ |
Create/delete/publish versions | ✅ | ✅ | ❌ | ❌ |
Publish/delete documentation sections | ✅ | ✅ | ❌ | ❌ |
Publish/delete API references | ✅ | ✅ | ❌ | ❌ |
Modify documentation, API references and versions settings | ✅ | ✅ | ❌ | ❌ |
Edit/archive synced blocks | ✅ | ✅ | ❌ | ❌ |
Publish pages | ✅ | ✅ | ❌ | ❌ |
Import/export project | ✅ | ✅ | ❌ | ❌ |
Generate PDF export/permalink | ✅ | ✅ | ❌ | ❌ |
Change project variables | ✅ | ✅ | ❌ | ❌ |
Lock/unlock versions | ✅ | ✅ | ❌ | ❌ |
Change plan | ✅ | ✅ | ❌ | ❌ |
Manage teammates | ✅ | ❌ | ❌ | ❌ |
Change project settings | ✅ | ❌ | ❌ | ❌ |
Create/view/revoke API key | ✅ | ❌ | ❌ | ❌ |
Delete project | Owner only | ❌ | ❌ | ❌ |
Setting up Teammates
If you are on a paid plan, you can invite your teammates to collaborate from the Team pane:
Open Project Settings → Team. You can also open the user menu in the top navigation and choose Invite teammates.
Click Invite editor, enter the e-mail address of the teammate to invite, and click Invite.
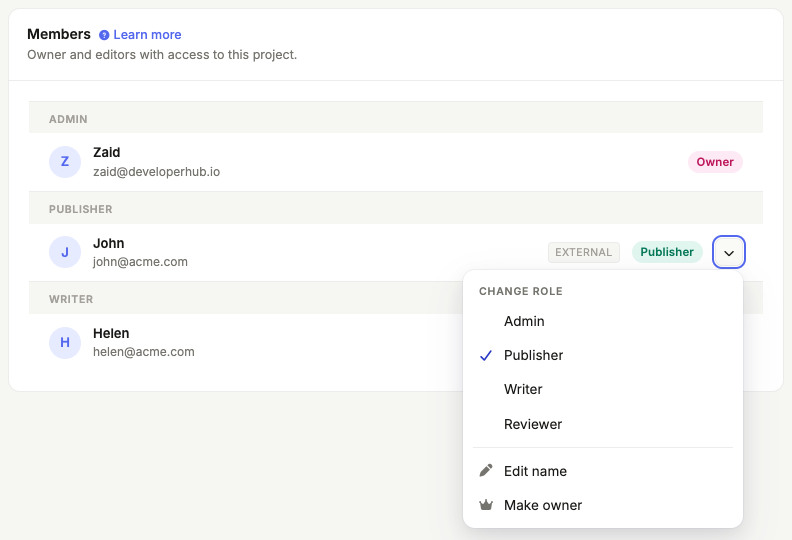
To change a teammate's role, open the menu on their row and pick the role under Change role.
To change a teammate's display name, open the same menu and select Edit name.
If they are not already a user, an e-mail message will be sent to the e-mail address to help them sign up. They will be added in the list, and an "Invited" badge will be next to their e-mail address until they are signed up.
If they are already a user, an e-mail message will be sent to their e-mail address to notify them that they can collaborate on this project. They will be automatically added and no prompt is required from them.
Remove a Teammate
To remove a teammate, do the following:
Open Project Settings → Team.
Open the menu on their row and select Remove from project.
This removes them from the project only. If your organisation adds every member to all projects automatically, Remove from project is not shown; manage them from Organisation Settings instead.
If your projects are part of an organisation, the organisation owner can also disable a member from Organisation Settings → Team. Disabling blocks them from logging in to any project, but keeps their account and history, and can be undone. See Organisation Settings.
If your organisation is managed (for Enterprise), check Deprovisioning Users.
Changing Project Ownership
To move ownership to another teammate:
Make sure that the user has been invited, has already joined the project as a teammate.
Open Project Settings → Team.
Open the menu on their row and select Make owner. Only the current owner sees this option.
Confirm your choice. The user will receive an e-mail that they became an owner of the project.
Once you transfer ownership, you cannot take it back unless if the new owner transfers it back to you.
If you have a supercharged plan, then the invoice by default would be sent to the e-mail address of the user who purchased the plan, not the owner. If you wish to modify the e-mail used for receiving invoices, check Changing Payment/Billing Details.